


So you already got your hammock. What’s next?
All Lesovik products are ready to use right after unpacking. You don’t need to think of anything else – just choose your spot and head off on a hammock adventure! However, before you set out for a few days of camping, practice setting up your hammock in the backyard or the nearest park, so that you won’t encounter any difficulties later.
PACKING AND STORING A HAMMOCK
You should always pack your hammock by stuffing it fully into the bag. Avoid folding and rolling!
- Untie one of the ropes, coil it over your hand and put it in the bottom of the bag.
- Start shoving the hammock into the bag. The fabric will get a bit crumpled, but later you will be able to hang it faster as the hammock will neatly slide out of the bag without being rolled.
- Once the hammock is packed, close up the bag so the hammock doesn’t fall out.
- Coil the other rope around your hand and put on top of the bag.
- Close the bag by pulling down the cord lock.
If you follow these instructions, hanging a hammock will be much easier next time. Remember that if you fold it, it will take more space and become more difficult to hang. Also, avoid rolling as the hammock might accidentally slide out onto the ground and get wet, dirty or even damaged by thorns or other sharp items.
Hammocks can be stored stuffed for a long time if you pack them dry and clean. Storing a folded and wet hammock may cause irreversible damage to the fabric and its technical properties, not to mention the bad smell and looks.
HANGING A HAMMOCK
You can use the instructions below to hang a hammock with the help of the standard ropes and stuff sack. If you are using our SMUK Hammock Suspension, please refer to the guide included with the product.
With Lesovik products, you should only use the ropes included with the product. They are manufactured according to the strict guidelines, ensuring that they will withhold the weight of even three people in normal conditions of use. Using different sets of ropes may be hazardous. Especially avoid the so-called paracord (parachute cord) and alike as it’s nowehere near a required strenght or durability.
In order to set up a hammock, look for two trees that are at least 3 meters and optimally 4.5 meters apart (about 6 regular human steps). There is no upper limit to the distance between the two attachment points, but take into account the length of the ropes and the height that you will have to reach during hanging. The greater the distance, the longer suspension system you will need, and the higher it would need to be pitched.

For anchor points, you can use trees, bars, poles or even beams in a mountain hut – any items that you can wrap the ropes around and that will support the weight of the user.
Note that you should not tie a hammock to items that do not have a solid wall or ground attachment; are either sharp (it may damage the ropes) or moving. It may result in a painful fall!
The hammock should be hung evenly and with anchor points relatively at the same height. If you’re hanging it above the uneven terrain, one of the attachment points will need to be higher than the other one. Thanks to this, it will be easier to use the hammock comfortably and you will avoid moving uncontrollably in the opposite direction during sleep.
You will find a list of most important knots in our Most useful knots guide.
- When standing by the first anchoring point, take out just the rope from your stuff bag. Do not take out the hammock yet, so it doesn’t touch the ground and get dirty or wet. Tie the rope at a suitable height. Remember that the longer the distance between the anchor points, the higher the rope must be tied. For the distance of 4.5 meters, it would be around 175 cm above the ground.
- Holding the stuff bag open, move towards the other attachment point and let the hammock slide out neatly as you go.
- Tie the other rope to the second anchor point, making sure of the appropriate tension. Ideally, it should hang with a loose, deep sag and with its center about 50 cm above the ground. Do not pitch it too tight between the attachment points as it doesn’t only lead to discomfort, but it’s also detrimental to the ropes, seams and fabrics.
- Test your pitch by pressing down the center of the hammock with both hands.
- When entering the hammock, pull one of the edges under your knees and gently sit down while spreading the fabric behind your back. You might hear a quiet cracking sound – it’s your ropes tightening around the trees.
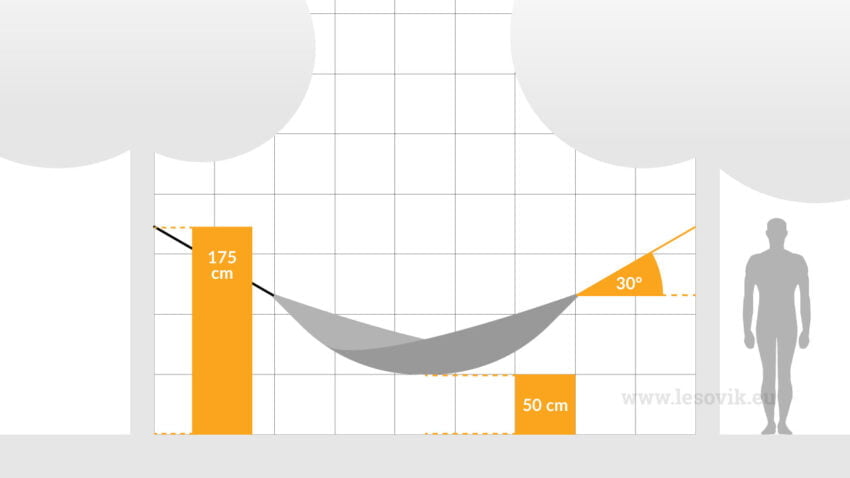
Take a look at the following schema illustrating the perfect hammock hang. Notice that the sit height is around 50 cm, the attachment points are about 175 cm above the ground, and the hang angle is 30° from the suspension line to the tree. Pitching a hammock this way guarantees a comfortable body position and reduces the amount of forces put on the suspension system.
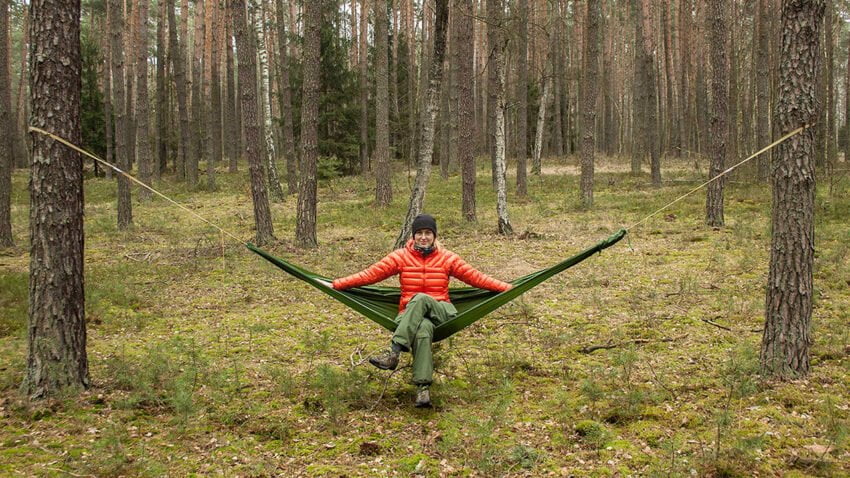
That’s how it looks like in reality (DUCH hammock):
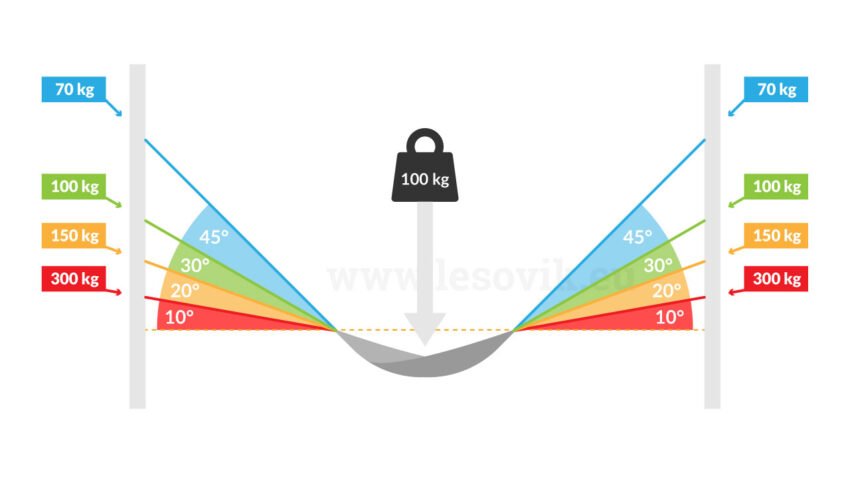
The hang angle has a huge impact on the amount of forces affecting the suspension system. The more horizontal the lines are, the greater the forces. The schema below shows how the load strain increases depending on the angle and with a 100 kg person sitting in a hammock. When the pitch is very tight and the hang angle is as low as 10°, the load will rise to 600 kg! This may bring damage to the fabric or ropes. The most optimal angle is 30° when the load is low (around 200 kg in this case), and at the same time you can easily hang the hammock at a height that is within reach for most people.
THE RIGHT WAY TO LAY IN A HAMMOCK
The construction of Lesovik hammocks allow for laying in diagonally in the so-called Brazilian style. This is the most natural, comfortable and healthiest position for your body. Pitch your hammock with a deep, banana-like sag, and lay on the diagonal with your head near the right edge and your feet near the left edge. This way you use the whole surface, so your body can find a flat position and your head can rest.
Lesovik hammocks allow you to sleep on the side or even with knees pulled towards your chest (fetal position) – it’s up to your own preferences.
If you like to sleep on your left side, place your shoulders near the left edge of the hammock and your feet near the right edge. If you prefer to sleep on your right side, you should move your shoulders to the right edge and your feet to the left.
Alternatively, you can opt for sleeping in line with the hammock, but we do not recommend this method as it may result in:
- squeezing your shoulders
- bending your neck
- pain in your knees (leg hyperextension)
- pressure on your heels
- your backside getting cold due to compression of your sleeping bag
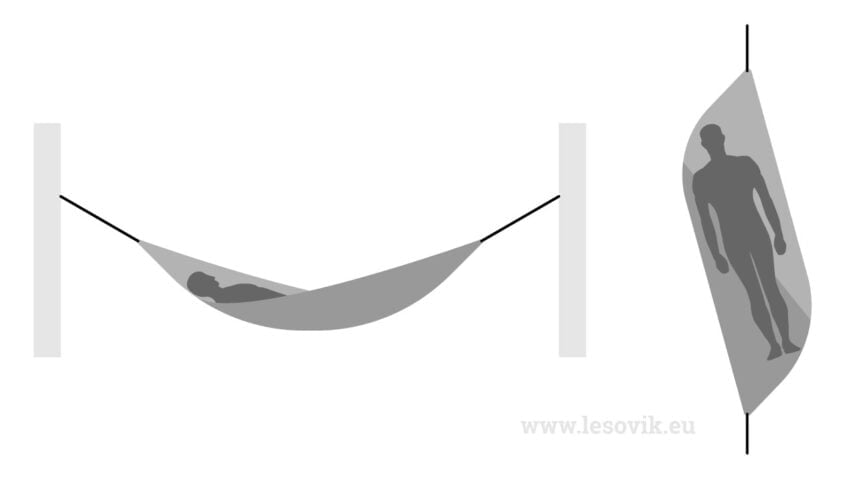
When compared to sleeping in line with the hammock, most people find the Brazilian style to be more comfortable and natural, getting a better night’s rest. The schema below shows how to lay on the diagonal. This position is only possible when you hang the hammock loose. See the side view on the left and the view from above on the right.
PACKING A HAMMOCK
After a good night’s rest, let your hammock hang empty for some time. Take out your sleeping bag and let the fabric dry out – the hammock may get slightly damp even from water vapor coming through your skin, or after being exposed to morning dew or any other kind of dampness. Use this time to brew a cup of coffee and treat yourself to a proper breakfast!
Before packing, make sure not to leave anything inside the hammock like sand or your personal items.
- Untie one of the ropes, coil it over your hand and put it in the bottom of the bag.
- Start shoving the hammock into the bag. The fabric will get a bit crumpled, but later you will be able to hang it faster as the hammock will neatly slide out of the bag without being rolled.
- Once the hammock is packed, close up the bag so the hammock doesn’t fall out.
- Coil the other rope around your hand and put on top of the bag.
- Close the bag by pulling down the cord lock.
BISHOP BAG
A bishop bag is a double-sided stuff sack that looks like a tube and has cord locks on both ends. It comes as standard with our DUCH Olive Green, DUCH Coyote Brown and PANTERA 2. With the bishop bag, the process of hanging a hammock is even easier and it’s also harder to lose the bag outdoors. When using it, you should follow the same guidelines as for regular storage sacks (sewn on one side). The difference is when you pitch it to anchor points:
- When standing by the first attachment point, open one side of the bishop bag just a little bit by pulling the cord lock. Take out just the rope (do not take out the hammock), and tie it a suitable height.
- Open the other side of the bishop bag, also take out just the rope and go towards the second attachment point – the hammock will slide out of the bag as you go.
- Pitch the hammock to the second anchor point.
The bishop bag will stay at one of the ends of the hammock. When packing, start from the same end. Untie the rope, coil it over your hand, but don’t put it in the bag yet – follow the steps from the instruction above. When finishing, put the rope into the bishop bag from the same side where it was first sticking out. Now it’s done!
Copying, republication or redistribution of this guide is allowed only after clearly indicating the source – lesovik.eu


